Configuring DNS and HTTP servers
Configuring DNS and HTTP servers can be complex on real hosts. To allow you to learn network configurations without risking breaking anything, we will use Netkit. Netkit is network emulator based on User Mode Linux. It allows to easily set up an emulated network composed of virtual Linux machines, that can act as end-host or routers.
Note
Where can I find Netkit?
Netkit is available at http://www.netkit.org. For the labs, we have built a custom netkit image which is installed on the INGI servers [1] .
There are two ways to use Netkit : The manual way, and by using pre-configured labs. In the first case, you boot and control each machine individually, using the commands starting with a “v” (for virtual machine). In the second case, you can start a whole network in a single operation. The commands for controlling the lab start with a “l”. The man pages of those commands is available from http://wiki.netkit.org/man/man7/netkit.7.html
A netkit lab is simply a directory containing at least a configuration file called lab.conf, and one directory for each virtual machine.
The directory of each device is initially empty, but will be used by Netkit to store their filesystem.
The lab directory can contain optional files. Some labs will include configuration files while others will use scripts that are executed when the virtual machines boot.
Starting a lab consists thus simply in unpacking the provided archive, going into the lab directory and typing lstart to start the network.
Note
netkit tools
As the virtual machines run Linux, standard networking tools such as ping(8), tcpdump, netstat etc. are available.
Another useful hint is that is it possible to share files between the Netkit virtual machines and the local host. Virtual machines can access to the directory of the lab they belong to. This directory is mounted in their filesystem at the path /hostlab.
Starting Netkit in the lab
Netkit has been installed in the INGI labs. In order to run the Netkit network emulator, launch the following commands:
ssh -Y <ingilogin>@permeke.info.ucl.ac.be
export PATH=$PATH:/etinfo/applications/netkit/bin
To launch a single host instance, use the command vstart:
vstart hostname
To launch the DNS lab[#fdnslab]_, use the following commands:
cp -r /etinfo/applications/netkit/dnslab/ $HOME/    # do not forget the trailing /'s
lstart -f -d $HOME/dnslab
To stop the lab, please stop all the involved instances by using the command halt inside each virtual machine.
Do not forget to cleanup the virtual disks when you are finished:
rm -f $HOME/dnslab/\*.disk
Exploring DNS
In this lab, you will experiment with the Domain Name system. Several DNS servers and resolvers are preconfigured in the Netkit which is provided.
Below, you can find a graph where the DNS topology we will use is depicted.
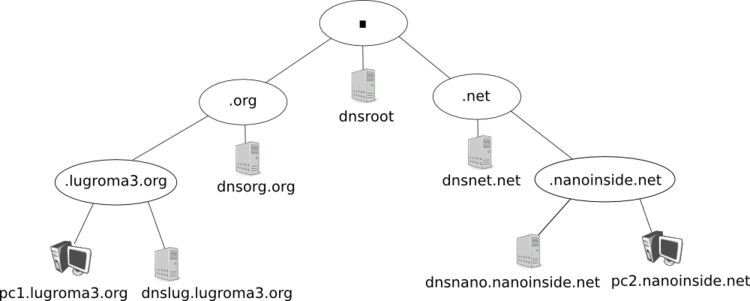
To begin experimentation, start the lab by using the commands explained above. In this lab, the DNS servers are correctly configured. We ask you to find the IP address of the following fully qualified domain names (FQDN):
- pc2.nanoinside.net
- dnsorg.org
- dnsroot
For this, you should use the dig command whose syntax is :
dig @server -t type FQDN
If no server is specified, dig uses the default resolver that you can find in the configuration file /etc/resolv.conf.
While doing these requests, observe the packets that are exchanged between the differents DNS server with the +trace option. Is this what you expected? Sketch the Questions/responses on the figure below.
You have learned that DNS can work in two ways: Forward and Reverse. We will now resolve IPv6 addresses into their corresponding DNS names. Find the FQDN domain name of the following IPv6 addresses :
- 2001:db8:ba1:b0a::22
- 2001:db8:ba1:b0a::2
Again, you should use the dig command but with the -x option.
dig @server -x ipv6
with as parameter the IPv6 address you want to resolve.
Using DNS to access a website
Now that you have played a bit with deployed DNS servers and resolvers, we will now try to add a DNS entry that will point to some IP address and setup a website that can be reached through the added DNS entry.
We will create the website on pc2 and we will call it helloworld.nanoinside.net. You thus have to add a DNS entry so that helloworld.nanoinside.net points to the IP address of pc2. See https://help.ubuntu.com/community/BIND9ServerHowto for a tutorial on how to configure bind9.
Once the DNS entry is set up, it is time to configure the web server. Apache2 is installed. See http://tuxtweaks.com/2009/07/how-to-configure-apache-linux/ for a tutorial. The final goal is to see “Hello world !” when accessing the website:
$ curl -s helloworld.nanoinside.net
Hello world !
The configuration files of apache are located in /etc/apache2/
Enjoy !
Footnotes
| [1] | The image that we use is a custom Netkit filesystem with a recent 64 bits Linux kernel. If you wish to test it on your own Linux machine, you can install Netkit as explained on http://wiki.netkit.org and download the filesystem and kernel images from http://cnp3bis.info.ucl.ac.be/netkit/netkit-images.zip Note that this archive has a compressed size of more than 1 GByte ! |
| [2] | The files used by the DNS lab are available from /netkit/netkit-lab_dns.zip if you would like to use them on your laptop. |